 Low Online Discount Prices
 Fast Delivery
 Safe and Secure Online Checkout
That time of year has come again. The darker nights are quickly closing in, the temperature outside is slowly dropping, and you have decided to turn on the radiators in your home. Have you debated whether to replace or update your radiator valve?
You may ask, “Why should I change my radiator valve“? There are several reasons why you might consider changing your radiator valve. The first and most obvious reason is if the valve is broken or faulty, as this can hinder your ability to effectively control the heating in your home. Another reason to change your radiator valve is for efficiency. Over time, valves can become worn or damaged, and replacing them can improve the overall performance of your heating system. Lastly, aesthetics can be a compelling reason to change your radiator valve. If your current valve doesn’t match your home’s colour scheme or style, replacing it with one that does can improve the overall look of your space.
This blog post will expertly guide you through efficiently removing and installing a new radiator valve. Unless you are confident about more advanced DIY jobs, we recommend hiring an experienced trade professional to deal with plumbing issues within your home. We also have a dedicated guide on how to install a radiator.
When should I change my radiator valves?
Changing radiator valves is not a frequent requirement. Still, there are certain circumstances when it becomes necessary for the efficient functioning of your heating system. A malfunctioning valve can hinder your ability to control your home’s heating effectively. Another situation where changing your radiator valve might be needed is upgrading to a new thermostatic radiator valve (TRV). 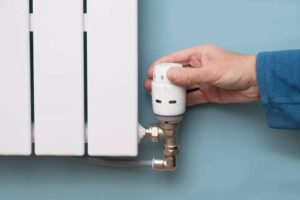
What is a Thermostatic Radiator Valve?
A Thermostatic Radiator Valve (TRV) is a specialised valve that adjusts the flow of hot water to a radiator based on the surrounding room temperature. This self-regulating mechanism ensures that your living spaces maintain a consistent and comfortable temperature. When the room temperature drops below the set level on the valve, it opens to allow more hot water into the radiator, increasing the heat output.
Conversely, when the room reaches the desired temperature, the valve automatically reduces the flow of hot water, maintaining the optimum temperature and conserving energy. This energy-saving feature improve your comfort and contributes to reducing your carbon footprint and lowering your heating bills.
Can you change a radiator valve without draining the system?
Yes, changing a radiator valve without draining the entire system is possible. This method can save you time and hassle, making the process less tedious (more on this shortly). If not done correctly, there’s a risk of causing damage to your heating system. Therefore, if you’re uncomfortable undertaking such tasks, seeking professional help is always advisable.
Are radiator valves interchangeable?
Most radiator valves are interchangeable. The standard size in the UK is 15mm. However, alternate sizes are available (8mm, 10mm and 22mm). There is only sometimes interchangeability between different brands or models unless by sheer chance. Furthermore, whilst all Thermostatic Radiator Valves may have a standard thread size, they are calibrated differently, requiring you to match the manufacturer/model.
How to change radiator valves without draining the system?
You will need (for both options):
Towel/ Old Cloth
An old container or a bucket
Adjustable spanner
Radiator bleed key or a flat-top screwdriver
Jointing compound
Pliers
Radiator Drain Hose/ Dedicated Draining Kit
Please note that this is a general how-to guide. Although we have tried to make this guide universal, your radiator valve set-up may differ. We always suggest consulting a trade professional before undertaking a plumbing task.
Step One: Turn off the valves
Turn off the radiator drain valve to stop the water flow to the radiator. Alternatively, if the radiator has a lock shield, use the adjustable spanner to turn it off.
Step Two: Release the pressure
Slowly release the pressure from the radiator using a flat-top screwdriver or a bleed key. Some water may start to leak from the valve (see our guide on how to bleed a radiator), so use the old towel or cloth to prevent the water from spilling onto the floor. Once the hissing noise has stopped, close the valve and tighten it back to the original position.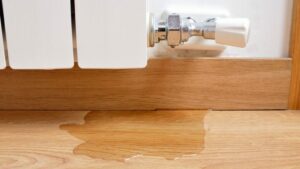
Step Three: Loosen the valves
Using the spanner, carefully undo the large-cap nuts until you hear them clock. Some excess water may spill from the valves, so have your towel ready. After draining the water from the valves, grab a spanner or pliers. With these tools, unscrew the nuts and extract the valve from the radiator.
Step Four: Install the new valve
Whether the valve is manual or thermostatic, align the body with the radiator valve adapter and tighten the cap nut. Be careful not to tighten it too much, or the thread is at risk of getting damaged! Using some form of jointing compound ensures a watertight seal.
Step Five: Final checks
Please make sure the valves are tight and ensure they are all closed. Turn the system back on and watch for leaks within the new joints. Once you’re happy with this, open the new radiator valve so the water can flow into the radiator. Bleed the radiator again to remove any trapped air (it is also worth bleeding any radiator near the new radiator valve).
How to change radiator valves by draining the system?
Step One: Turn off the heating system: The first step in changing your radiator valves is to turn off your heating system. This will prevent hot water from circulating and potentially causing injury.
Step Two: Drain the system: Next, you’ll need to drain the system. This can typically be done by locating the drain valve on your central heating system and attaching a hose to it or with a Radiator Drain Hose Kit. The other end of the hose should be placed somewhere where the water can safely drain away, such as outside or into a bucket.
Step Three: Remove the old valve: Once the system has been drained, you can remove the old valve. Typically, you loosen the cap nuts connecting the valve to both the radiator and pipe.
Step Four: Install the new valve: After removing the old valve, you can install the new one. Make sure to tighten the cap nuts securely to prevent any leaks.
Step Five: Refill the system: Once the new valve is installed, you can refill the system. This is typically done by closing the drain valve and opening the filling loop on your boiler.
Step Six: Bleed the radiators: Finally, you’ll need to bleed the radiators to remove any air that may have gotten into the system during the process.
Why should I shop for radiator valves at ShowerstoYou?
ShowerstoYou, a trusted online bathroom supplier in the UK, has provided customers with an impressive range of Radiators, Heated Towel Rails, and Radiator valves for over four decades. With our extensive experience and deep understanding of bathroom and shower supplies, we have built a team of knowledgeable professionals who are always ready to assist you with your needs.
If you have any questions, need guidance, or wish to place an order, our customer service team is readily available to assist you. You can contact us via email at info@showerstoyou.co.uk, call us on 01472 242159, or get in touch through our online contact form. We look forward to helping you find the perfect radiator valve.
Still have more questions on valves? Why not check out our Radiator Valves FAQs for the most commonly asked questions answered?