 Low Online Discount Prices
 Fast Delivery
 Safe and Secure Online Checkout
Updating your bath panel can dramatically improve the aesthetics of your bathroom, offering a polished, modern look. Bath panels don’t just hide the pipes beneath your bathtub. They add that final finishing touch to your space. This guide from Showers to You will walk you through the process of how to install the two popular types of bath panels (acrylic and wooden), all while addressing common questions about installation.
Whether you’re a seasoned DIYer or a first-timer, with the right tools and approach, learning how to install a bath panel can be straightforward and rewarding.

Kartell Astlea Front and End Bath Panels
Preparing for Installation
Before you begin, preparation is crucial. From gathering the necessary tools to taking accurate measurements, the groundwork you lay will determine the success of your installation.
Tools and Materials You’ll Need
For Acrylic Bath Panels:
- Electric drill
- Handsaw
- Screwdriver
- Spirit level
- Pencil
- Tape measure
- Wooden battens
- Wood screws
For Wooden Bath Panels, you’ll also need:
- Sealant gun
- Silicone sealant
- Wood varnish
- Wood adhesive
Can I Install a Bath Panel Myself?
Yes, you absolutely can! Installing a bath panel doesn’t require specialised skills, making it a great DIY project. However, you’ll need to take your time, ensure your measurements are accurate, and follow proper steps for a neat, professional finish.
Wayne H’s Review of the Scudo 1800mm Wooden Front Bath Panel in Matt Grey:
“Great quality product. It is really solid, and the colour and texture are easy to clean and wipe down. Customer service is great, too, as they responded and dealt quickly with my query. Competitive price, too.“
Importance of Accurate Measurements
Measure twice and cut once. Accurate measurements make all the difference in ensuring your panel fits snugly against your bathtub, whether you are installing a front or an end bath panel. Use a tape measure to record both length and height from the top rim of the bath to the floor, and always double-check before cutting battens or panels.
How to Install an Acrylic Bath Panel
Acrylic bath panels are lightweight, durable, and straightforward to install, making them a popular choice for single and double-ended baths.
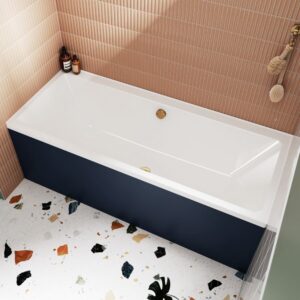
Nuie Standard 1800mm Satin Midnight Blue Acrylic Front Bath Panel
Step 1 – Measure and Cut Wooden Battens
Using your tape measure, determine the length required to support the bath panel where it meets the floor. Cut the wooden battens using a handsaw to match these measurements. Ensure the battens are straight and even for a perfect installation.
Step 2 – Secure the Battens
Position the cut battens along the markings on the floor where the bath panel will sit. Use a spirit level to ensure the battens are aligned correctly. Secure the battens to the floor using wood screws, but avoid overtightening, as you’ll later need to slide the panel into place.
Step 3 – Place the Panel
Slide the bottom lip of the acrylic bath panel under the batten. The panel should ‘hook‘ securely into position, creating a clean alignment with the bathtub. Check once more that everything is straight with your spirit level.
How to Install a Wooden Bath Panel
Wooden bath panels are heavier and more challenging to manoeuvre but offer a stunning and sophisticated look. Here’s how to install one:
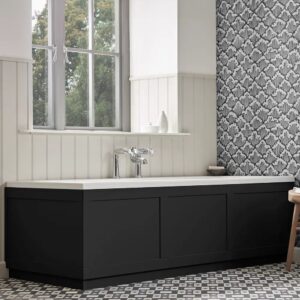
Tavistock Lansdown Isocore 1700mm Front Bath Panel in Matt Black
Step 1 – Prepare the Battens
Just like with an acrylic panel, measure and cut wooden battens to support your wooden panel. Position the battens on the floor and secure them with screws.
Step 2 – Apply Wood Adhesive
Apply a thin bead of wood adhesive to the edge of the bath panel or battens where they will connect for added stability. If your wooden panel includes a plinth, prepare it for installation by trimming it to the desired height and attaching it securely to the panel edge.
Step 3 – Fit the Panel and Apply Sealant
Align the panel with the battens and ensure it fits correctly. Apply silicone sealant around the edges of the panel where it meets the bath and floor to create a watertight seal. Use a sealant gun for precision and smooth it with your finger or a sealant tool.
Common Questions About Bath Panel Installation
Do You Silicone the Bottom of a Bath Panel?
Yes, applying silicone at the bottom of the panel where it meets the floor is recommended. This ensures the panel stays in place and prevents water from seeping underneath.
Do You Silicone the Top of a Bath Panel?
While it’s not mandatory, you can apply silicone to the top edge of the panel where it meets the bath for added stability and a flawless finish. A watertight seal here prevents water ingress and offers additional durability.
How to Install a Bath Panel with a Plinth?
Bath panels, including front bath panels, are an essential part of finishing your bathtub installation. For panels with a plinth, you’ll first need to attach the plinth to the panel. Measure and trim both pieces to the right sizes, then fix them together using wood adhesive or L-shaped brackets with screws. Once assembled, the panel and plinth are installed together using wooden battens and secured with screws or adhesive.
How to Install Bath Panel Clips?
Bath panel clips are a great option for an easy, tool-free installation. Fix the clips onto the battens first, then snap the bath panel securely into place. Clips make removing the panel easier for cleaning or maintenance. Nuie Bath Panels are available with optional clips from the drop-down menu.
Proper Installation Means Beauty That Lasts
Learning how to install a bath panel might feel daunting at first, but following these steps will ensure a successful project. By taking accurate measurements, preparing the right tools, and following clear installation practices, you’ll achieve a snug, stylish result.
Whether you’re opting for the practicality of an acrylic panel or the timeless elegance of a wooden one, proper installation ensures your bathroom remains as functional as it is beautiful. If you want to simplify the process further, consider shopping for bath panels that match your ideal dimensions. This reduces the need for cutting and makes installation even easier.
Browse and shop today on Showers to You to discover how bath panels can transform your bathroom. Call us today at 01472 242159 or contact us through our easy-to-use contact form for more information!