 Low Online Discount Prices
 Fast Delivery
 Safe and Secure Online Checkout
A dripping tap might seem like a minor annoyance, but it can quickly become costly. The constant drip-drip-drip sound can also disrupt peaceful evenings and restful sleep. Learning how to fix a dripping tap is one of the most straightforward plumbing jobs you can tackle yourself. With basic tools and a bit of patience, you can stop that persistent drip and save money on both water bills and plumber call-out fees. This guide from Showers to You will walk you through everything you need to know about repairing both traditional taps and modern basin mixers.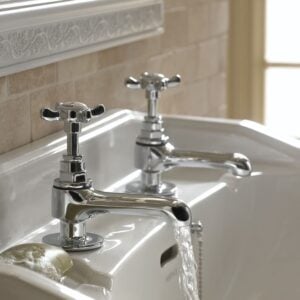
Safety First: Turn Off the Water Supply
Before starting any tap repair, you must turn off the water supply. This prevents flooding and allows you to work safely without water spraying everywhere.
Locate the isolation valves under your sink or basin. Turn these clockwise to shut off the water flow. If you cannot find isolation valves, turn off your mains water supply. Once the water is off, turn on the tap to drain any remaining water from the pipes.
Top tip: Place the plug in your sink or basin to prevent small parts from disappearing down the drain.
Tools and Materials You’ll Need
Gather these essential items before you begin:
- Adjustable spanner
- Cross-headed screwdriver
- Flat-headed screwdriver
- Replacement washers, O-rings, or ceramic cartridges
- Lubricant such as WD40
- Small bowl or towel to catch water
Having everything ready before you start will make the job much quicker and smoother.
Understanding Different Types of Taps
Traditional Taps
These require multiple turns to reach full flow and use rubber washers to create a seal. When the washer wears out, water begins to drip from the spout.
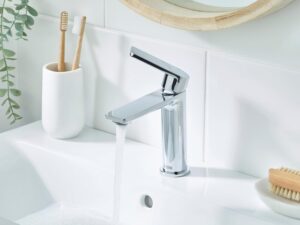
Monobloc Lever Taps (Basin Mixers)
Modern kitchen mixer taps and basin mixers operate with a quarter or half turn. Instead of washers, they use ceramic disc cartridges that occasionally need replacement.
Identifying Your Tap Type
Turn your tap on to determine which type you have. If it requires several full turns, it’s traditional. If it operates with a short lever movement, it’s a monobloc design.
How to Fix a Dripping Tap: Step-by-Step
Fixing Traditional Taps
Step 1: Remove the Tap Head
Carefully remove any decorative caps covering the screws. These usually unscrew by hand or can be gently lifted off with a flat-headed screwdriver.
Step 2: Unscrew the Handle
Use your screwdriver to remove the screw holding the tap head in place. Lift off the handle to expose the internal mechanism.
Step 3: Remove the Metal Cover
Unscrew any metal cover protecting the valve mechanism underneath. Lay all parts out in the order you removed them for easy reassembly.
Step 4: Replace the Rubber Washer
Locate the hexagonal nut and loosen it with your adjustable spanner. Remove the tap stem to access the rubber washer at the bottom. Replace the worn washer with a new one of the same size.
Top tip: If the nut is stubborn, spray it with WD40 and wait a few minutes before trying again.
Fixing Monobloc Taps (Basin Mixers)
Step 1: Access the Cartridge
Remove the handle cap to expose the cartridge fixing. You may need an Allen key depending on your tap design.
Step 2: Remove the Cartridge
Use your adjustable spanner to loosen and remove the hexagonal nut holding the ceramic cartridge in place.
Step 3: Replace the Ceramic Disc
Identify whether you’re working on the hot or cold cartridge (hot cartridges typically have red indicators, cold have blue). Simply remove the old cartridge and replace it with a new one.
For a reliable and stylish basin mixer, the Bristan Frammento Eco Start Basin Mixer with Waste in Chrome is an excellent choice. Priced at £82.50, this contemporary tap combines sleek design with innovative functionality. Its Eco Start technology ensures energy efficiency by defaulting to cold water, reducing unnecessary boiler usage and lowering energy bills. Customer reviews highlight its reliability:
- “Brilliant product & service.” – Geoff W
- “This has an easy one-direction lever with a great flow rate. Although this says it has a low flow rate at 0.5, I found I had to remove the orange plastic filter. Better flow now.” – John S
Replacing O-Rings
If replacing the washer or cartridge doesn’t solve the problem, worn O-rings may be the culprit.
Step 1: Locate the O-Ring
Unscrew the spout to access the O-ring, which appears as a rubber ring around the tap mechanism.
Step 2: Remove the Old O-Ring
Carefully remove the worn or damaged O-ring with a screwdriver. If it’s particularly stubborn, you can cut it off with scissors.
Step 3: Install the New O-Ring
Roll the replacement O-ring into position, ensuring it sits properly in the groove.
Troubleshooting Common Issues
How do I stop my tap from dripping?
Worn washers, damaged O-rings, or faulty ceramic cartridges cause most dripping taps. Follow the appropriate repair steps above based on your tap type. Always ensure you’ve turned off the water supply before starting work.
Is it easy to fix a leaky tap yourself?
Yes, fixing a leaky tap is one of the simpler plumbing jobs. Most repairs take 30-60 minutes and require only basic tools. The key is identifying your tap type and having the correct replacement parts.
Is there a temporary fix for a dripping tap?
While there’s no reliable temporary fix, you can place a cloth around the tap spout to muffle the sound temporarily. However, this won’t stop water waste, so it’s better to complete the proper repair as soon as possible.
Prevention Tips
Regular maintenance can prevent future dripping taps:
- Don’t overtighten taps – this can damage washers and cause premature wear.
- Replace washers and O-rings every few years as preventive maintenance.
- Clean tap aerators regularly to prevent mineral buildup
- Address small leaks immediately before they become major problems.
If problems persist after your repairs, it might be more cost-effective to replace the entire tap. For kitchen applications, learn how to change a Kitchen Tap with our comprehensive installation guide.
When to Replace Rather Than Repair
Sometimes replacement makes more sense than repair. Consider a new tap if:
- Repair costs approach the price of a new tap
- Multiple components need replacement
- The tap is very old with hard-to-find parts
- You want to upgrade to a more efficient model
For complete installation guidance, read our detailed guide on How to Install a Tap.
Complete Your Tap Repair Today
Fixing a dripping tap is a straightforward job that saves water, money, and gives you the satisfaction of a successful DIY repair. With the right tools and replacement parts, you can stop that annoying drip and restore your tap to perfect working order.
Remember to work methodically, keep track of all parts during disassembly, and don’t hesitate to take photos during the process to help with reassembly. Most importantly, never overtighten components, as this can cause damage requiring more extensive repairs.