 Low Online Discount Prices
 Fast Delivery
 Safe and Secure Online Checkout
That persistent drip from your kitchen or bathroom tap isn’t just annoying – it’s wasting water and money. Most dripping taps have one simple cause: a worn tap washer. Before calling a plumber, learn how to change a tap washer yourself with this guide from Showers to You. This straightforward DIY job takes just 30 minutes and costs a fraction of professional repair fees.
Why Do Taps Leak?
Understanding how your tap works makes the repair process clearer. Inside your tap, two main components control water flow: the valve seat and the tap washer. When you turn the tap off, the washer presses against the seat to create a watertight seal. Over time, this washer wears down or becomes damaged, allowing water to leak through and make that familiar dripping sound.
Most traditional taps use rubber washers that compress against the valve seat. When these washers deteriorate, they lose their ability to form a proper seal. This simple mechanical failure causes the majority of household tap leaks.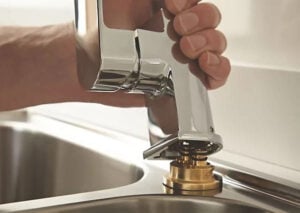
Tools You’ll Need
Gather these basic tools before starting your repair:
- Adjustable spanner or set of spanners
- Flathead screwdriver
- Cross-head screwdriver
- Replacement tap washer (various sizes available)
- Penetrating oil (for stubborn nuts)
- Small bowl (to catch water)
- Cloth or towel
Having everything ready before you begin will make the job run smoothly without interruptions.
Step-by-Step Instructions
Step 1: Turn Off the Water Supply
Safety comes first. Locate the isolation valve under your tap and turn it clockwise to shut off the water supply. If you can’t find an isolation valve, turn off your mains water supply instead. Once the water is off, run the tap to drain any remaining water from the pipes.
Important: Place the waste in your basin to prevent small screws or washers from falling down the drain.
Step 2: Protect Your Work Area
Cover the basin or sink with a towel to protect it from dropped tools. This prevents damage to your sanitaryware and makes cleanup easier.
Step 3: Remove the Tap Head
Most taps have a decorative cap covering the fixing screw. Use a flathead screwdriver to carefully remove this cap carefully, revealing the screw underneath. Unscrew this fixing and lift off the tap head to expose the valve mechanism.
Step 4: Remove the Valve Assembly
Use your adjustable spanner to loosen the hexagonal nut that holds the valve in place. If the nut feels stuck, apply a small amount of penetrating oil and wait a few minutes before trying again. Once loose, unscrew the valve completely and lift it out.
Step 5: Replace the Tap Washer
At the bottom of the valve assembly, you’ll find the tap washer secured by either a small screw or a nut. Remove this fixing and take out the old washer. Compare it with your replacement to ensure you have the correct size and material.
Insert the new washer in the same position as the old one and secure it with the screw or nut. Don’t overtighten – just make it snug.
Step 6: Reassemble the Tap
Reverse the disassembly process. Insert the valve back into the tap body and tighten the hexagonal nut with your spanner. Replace the tap head and secure it with the screw. Finally, replace the decorative cap.
Turn your water supply back on and test the tap. The dripping should have stopped completely.
Choosing the Right Washer
Tap washers come in different materials and sizes. Common materials include:
- Rubber – Most common and suitable for standard taps
- Nylon – Durable and long-lasting
- Fibre – Traditional material, still effective
- Polythene – Modern synthetic option
Washers range from 9mm to 40mm in diameter. The easiest way to get the correct replacement is to remove your old washer first and take it to your local hardware store for matching.
Frequently Asked Questions
Is it easy to replace a tap washer?
Yes, replacing a tap washer is one of the simplest plumbing jobs you can do yourself. With basic tools, some patience, and about 30 minutes of your day, most people can complete this repair successfully. The key is working methodically and keeping track of all components as you remove them.
Do I need a plumber to change a tap washer?
No, you don’t need a plumber for this straightforward job. Changing a tap washer requires only basic tools and can save you significant money on call-out charges. However, if you encounter complications or feel uncomfortable with any step, don’t hesitate to contact a professional.
How do I fix a dripping tap washer?
The most effective solution is complete washer replacement. While you might temporarily reduce dripping by tightening the tap, this usually damages the washer further and creates bigger problems. For comprehensive guidance on all types of tap repairs, see our complete guide on how to fix a dripping tap.
Save Money with DIY Repairs
Regular maintenance prevents bigger issues. Don’t overtighten taps, as this damages washers prematurely. Replace washers every few years as preventive maintenance, and address small leaks immediately before they worsen.
With these skills, you can tackle tap washer replacement throughout your home, from kitchen taps to bathroom basins. Keep a selection of common washer sizes in your toolkit for quick repairs when needed.
Ready to fix that dripping tap and change a tap washer? Get your tools together and follow these simple steps for a permanent solution.