 Low Online Discount Prices
 Fast Delivery
 Safe and Secure Online Checkout
As the chill of winter begins to settle in, our reliance on heating systems increases exponentially. They become our silent partners, working tirelessly to keep us warm and comfortable. However, radiators are not immune to technical issues like any other mechanical system. Among the most common problems that homeowners face with their radiators are related to radiator valves. Understanding the functioning of your Radiator and its components is not just about problem-solving; it’s about maximising efficiency, prolonging the lifespan of your heating system, and ensuring your home is as warm and inviting as possible.
In this informative blog post, Showers to You delve into the intricate world of radiator valves. We discuss how to identify a broken valve, what to do if a valve gets blocked, and how to fix a leaky valve. We aim to equip you with the knowledge to ensure your radiator functions optimally throughout this cold season.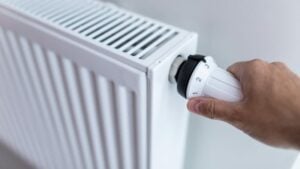
Why do Radiator Valves fail?
Radiator valves can fail due to several reasons. Age and frequent use can lead to wear and tear, causing leaks or complete failure. Similarly, corrosion, often triggered by high oxygen levels in the heating system’s water, can result in blockages and valve malfunctions.
An overlooked aspect of radiator maintenance can also contribute to valve failure. Without regular servicing, dirt and debris can accumulate, creating blockages that prevent proper valve operation. Incorrect installation is another potential cause. A valve must be fitted correctly, used with incompatible parts, or inadequately sealed to function as intended.
Lastly, temperature fluctuations can adversely impact the radiator valves. Extreme or repeated changes in temperature can cause the valves to expand and contract. Over time, this can lead to cracks, leaks, and eventual failure.
How do I know if my radiator valve is broken?
Identifying a broken radiator valve is crucial to maintaining the efficiency of your heating system:
Inconsistent Heating: If your radiators aren’t heating evenly, it may be due to a faulty valve. The uneven heat distribution could affect other components like your Heated Towel Rails.
Leaking Valve: A leaking valve is a clear sign of a problem. This can cause water damage and reduce your system’s effectiveness.
Noisy Radiator: If your Radiator makes unusual noises, it might indicate a valve issue.
Stuck Valve: If you can’t turn the valve or it’s hard to move, it’s likely broken.
Increased Energy Bills: A faulty valve can cause your system to work harder, leading to higher energy bills.
Can Radiator Valves get blocked?
Yes, radiator valves can indeed get blocked. This is usually due to a buildup of sludge, rust, or debris inside the valve. Blockages can prevent hot water from circulating effectively through your radiator system, leading to issues like inconsistent heating or cold spots on your radiators.
Regular maintenance is crucial to prevent such blockages. A professional can flush your system to remove buildup and ensure proper functioning. Additionally, installing high-quality valves can also reduce the risk of blockages.
Can you replace a Radiator Valve?
Yes, you can replace a radiator valve. The process involves draining the heating system, loosening the valve nuts, cleaning the pipes, and fitting the new valve. Our “How to Change a Radiator Valve” blog post has detailed steps.
How do I fix a stuck Radiator Valve?
Fixing a stuck radiator valve involves a few steps. Please remember safety is paramount, and having the right tools is essential. Here’s a step-by-step guide:
Prepare Your Tools: Gather the necessary tools like an adjustable spanner, pliers, and a cloth.
Turn Off Your Heating System: Always turn off your heating system before starting work on your radiators.
Locate the Stuck Valve: Identify which valve is stuck. It could be the lockshield valve or the control valve.
Loosen the Valve: Use the adjustable spanner and pliers to loosen the valve carefully. Use the cloth to protect the valve from any tool marks.
Check for Blockages: Once loosened, check for any blockages like debris or rust. Remove these if present.
Test the Radiator: Turn your heating system back on to see if the valve works properly.
If the valve remains stuck or you need clarification on performing these steps yourself, we recommend seeking professional assistance.
Can you use WD40 on a Radiator Valve?
WD40 can be used on a radiator valve, but caution is advised. This product is excellent for loosening stuck components and providing temporary relief from squeaking or stiffness. However, it’s not a long-term solution for a faulty valve. It’s important to note that using WD40 should never replace professional maintenance or repairs.
 How do I fix a Radiator Valve Pin?
Fixing a radiator valve pin is a task that requires careful attention and the right tools. It’s crucial to ensure safety and be equipped with the necessary tools before starting. Here’s a detailed step-by-step guide:
Gather Your Tools: You will require a few essential tools like an adjustable spanner, a pair of pliers, and a soft cloth to protect the valve from scratches or tool marks.
Turn Off the Heating System: This is a crucial safety step. Ensure your heating system is off and cool before working on the radiators.
Identify the Problematic Valve Pin: The valve pin is usually located inside the valve. Identify the one that seems to be stuck or non-responsive.
Loosen the Valve Pin: Carefully loosen the valve pin with the help of the adjustable spanner or pliers. Remember to use a soft cloth to protect the valve from damage.
Check for Blockages: Once the valve pin is loosened, check for any signs of blockages, such as debris or rust. If you find any, make sure to remove them.
Test Your Radiator: After these steps, switch your heating system back on to test if the valve pin functions correctly.
Can I fix a Radiator Valve without draining the system?
Fixing a radiator valve without draining the system is indeed feasible. It’s a process that requires some careful steps to ensure success, especially when dealing with high-quality products like Kartell Radiators.
Firstly, safety is paramount. Turn off the heating system. This step is crucial to prevent any accidents or damage during the procedure. Next, you must identify the problematic valve on your Kartell Radiator. Recognising the faulty valve is critical to a successful repair; misidentifying could lead to unnecessary work or damage.
Before starting the repair, you’ll want to protect the surroundings. Shielding the floor and nearby objects can prevent accidental damage from water or tools during the repair.
Once you’ve prepared the area, you can remove the old valves. This step should be done carefully to avoid causing additional issues with the Radiator. With the old valve removed, you’re ready to install the new valve. Replacing the valve correctly is critical for ensuring the proper function of your Radiator. After you’ve installed the new valve, testing the system is essential. Turn your heating system back on to see if the new valve works correctly. If you still need to, you may need to repeat some steps or seek professional assistance.
How do I fix a leaky Radiator Valve?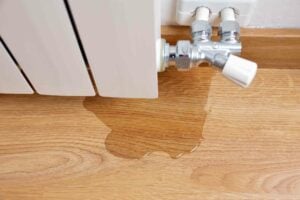
Fixing a leaky radiator valve involves a few key steps. Always remember that safety comes first. Before starting the procedure, turn your heating and water systems off. This is to prevent any potential accidents or damage during the process. Identify the problematic valve on your Radiator. Recognising the faulty valve is crucial to a successful repair; misidentifying it could lead to unnecessary work or damage.
Next, protect the area around your Radiator. Cover the floor and nearby objects to prevent accidental damage from water or tools during the repair. Now you’re ready to remove the old valves. This step should be done carefully to avoid causing additional issues with the Radiator.
Remove the old valve first, then proceed to install the new one. Replacing the valve correctly is essential for ensuring the proper function of your Radiator. After you’ve installed the new valve, testing the system is essential. Turn your heating system back on to see if the new valve works correctly.
If your radiator or radiator valve is still not working, the next step could be to Bleed the Radiators.